Update 11/8/2020: After being out of stock all spring and summer, this exact playhouse is now back in stock! Buy the Cedar Summit by KidKraft Greystone Cottage Playhouse on Walmart here.
Even before I had kids I was pinning images of cute playhouse makeover to my Pinterest boards. There is so much inspiration out there, and I couldn’t wait to personalize a playhouse of my own for my children to enjoy. The Christmas after my daughter Annabelle turned one I had my heart set on getting her an outdoor playhouse for her “big” gift.
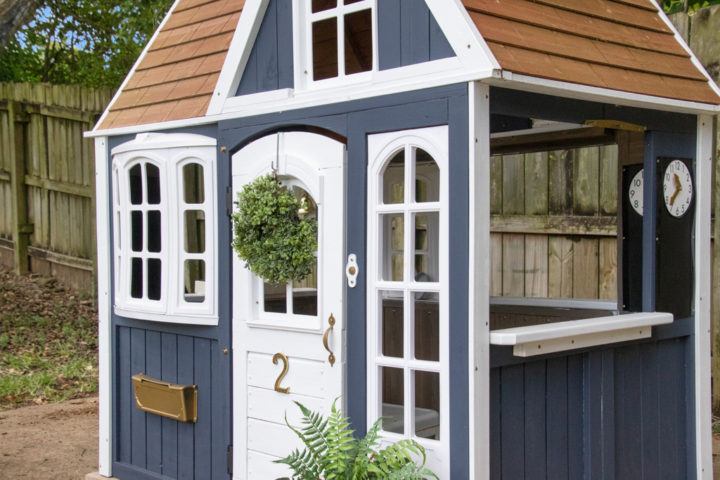
I’m not going to lie, this project was a significant undertaking. But it was worth every minute of the time spent. Annabelle absolutely adores her playhouse, and it has provided hundreds of hours of fun. All the neighborhood kids love it too. Plus, it’s a beautiful fixture in our backyard. It is a piece that I love to look at and I’m very proud of.
For more outdoor toys we love, read my post 15 Best Timeless Outdoor Toys for Toddlers.
In this post I’ll share:
- How I chose this playhouse
- The inspiration photos I used for choosing paint colors
- A step-by-step tutorial of how I painted and assembled it, and
- Links to all the paint, tools and accessories I used for the playhouse makeover
Choosing a Playhouse to Makeover

I did insane amounts of research on playhouses. I wanted something that was durable, provided lots of opportunity for pretend play, and was big enough that it would fit Annabelle as she grew. I ended up purchasing the KidKraft Greystone Cottage Playhouse. It has excellent reviews. Also, I liked the higher ceiling height this model offered versus others. I figured a taller playhouse would allow her to enjoy it for longer.
This model appears to be out of stock everywhere right now. Here are some other options I found that seem to meet the same criteria and are in stock:
- KidKraft Greystone Cottage Playhouse (Walmart) (Academy) (Wayfair)
- KidKraft Seaside Cottage Outdoor Playhouse (Walmart)
- Trail Timber Wooden Outdoor Playhouse (Wayfair) (Buy Kids Playhouse)
- Kidkraft Forrestview II Wooden Playhouse (Walmart)

Inspiration
I went back and forth on what color to paint the house. I found several houses in whites and light pinks that were beautiful, but I was worried the white wouldn’t hold up in the elements. Having a perpetually dirty playhouse would drive me nuts.
Ever a fan of all things blue and white I decided to use the following houses I found on Pinterest for inspiration for my playhouse makeover. I also liked the idea of leaving the roof the natural wood color. The blue and white scheme worked perfectly with the tone of the roof. I love the paint colors I chose out and they have held up really well in the elements.


Step-By-Step Playhouse Makeover Tutorial
Step 1: Unbox & Sort the Pieces
Time: 1 hour
People Required: 1
Supplies: Drop cloths and a box cutter

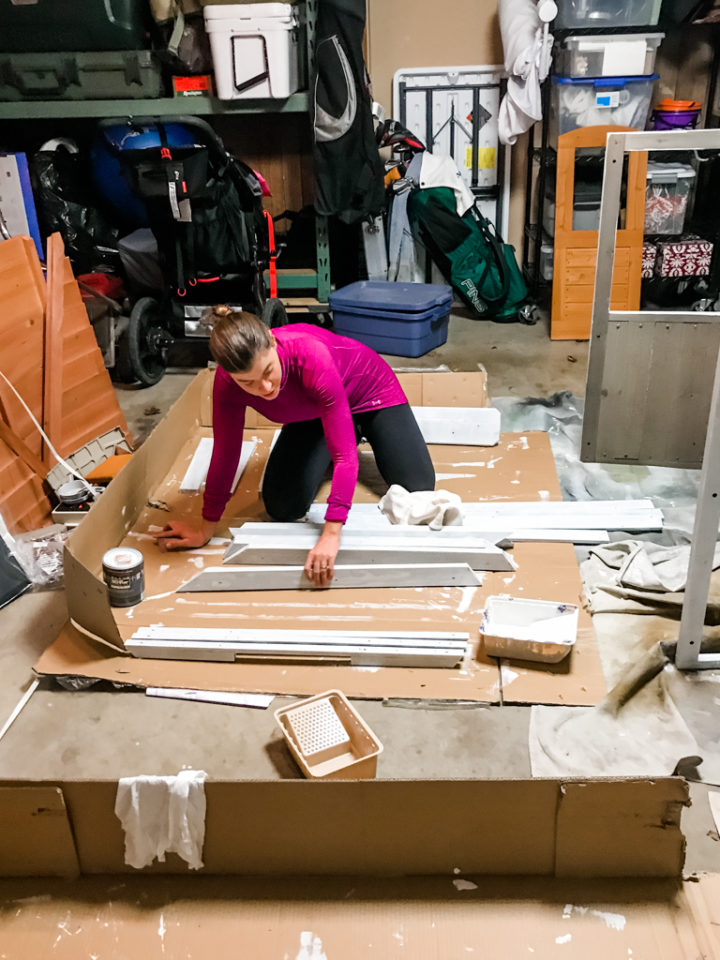
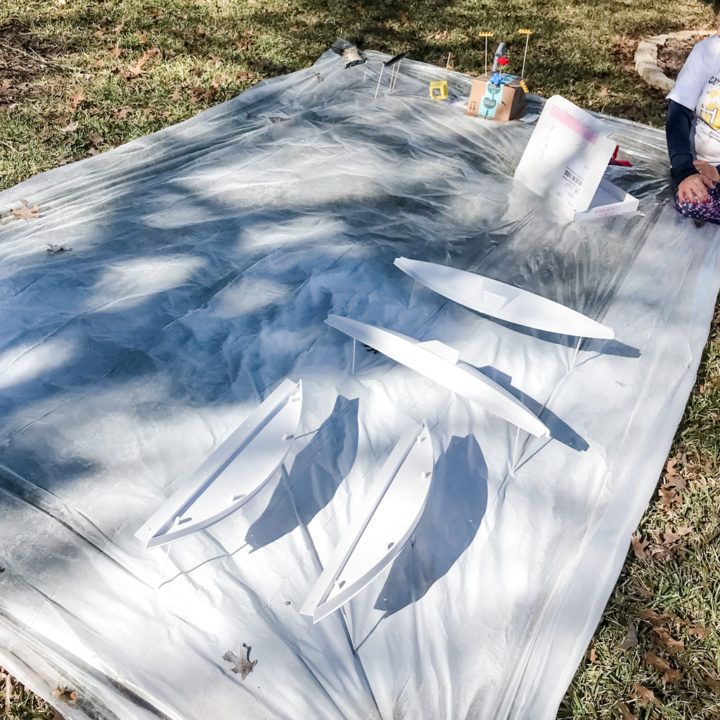
The first step is unboxing, inspecting and sorting all the parts. There are literally hundreds of pieces so this process can take quite a while. I’d recommend blocking out at least an hour for this step. I also recommend doing the unboxing in the place where you’ll be painting so you don’t have to move everything multiple times.
It was quite cold in January when I did this project, so I set everything up in our garage. I kept my car in the driveway while I finished sorting and painting everything. I did this project over the course of several days, but you could knock it out in a weekend if you wanted to go that route.
As soon as you get all the pieces out of the box, cut the box open so you can use it as a painting mat for your playhouse parts and accessories. I used additional drop cloths I had to cover the rest of our garage floor.
The instruction manual will be your best friend during this process. It will help you take an inventory of pieces and hardware to make sure you aren’t missing anything. (I wasn’t.)
It will also help you identify parts that may have broken during shipping. The original playhouse we got had some busted hinges and a few major nicks in the wood. I was able to quickly identify those parts and put in a help request on the KidKraft website so they could ship me new pieces.
Side note: I decided to give the playhouse boxed up to Annabelle for Christmas and assemble it afterwards. If you plan to have the playhouse ready for Christmas or a birthday I recommend ordering well in advance so you can inspect the parts and replace anything if needed. KidKraft was wonderful and shipped me the new pieces for free, but it did take a couple of weeks to get the new parts.


Flipping through the assembly instructions will allow you to group the various pieces into the parts that will go together and sort by the color you want to paint them. I sorted all the pieces and grouped them onto the various cardboard boxes and dropcloths by the color I was going to paint them.
Step 2: Tape Off The Window
Time: 20 minutes
People Required: 1
Supplies: Painter's tape
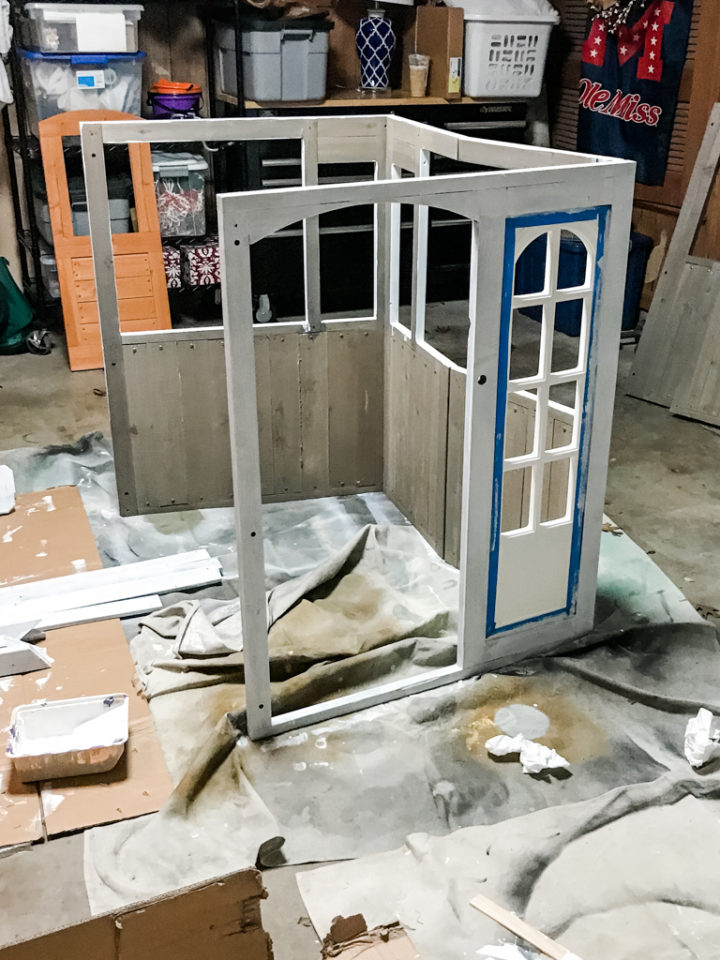
Depending on the model of playhouse you choose, you may or may not need to tape off the window. Ours had one white plastic window that came preinstalled so I used painters tape to tape it off so I wouldn’t get paint on it.
At first I was going to paint the inside of the playhouse, but decided part way through to ditch that idea. (I don’t regret it.) After the primer I decided to tape off the inside of the windows to get cleaner lines since I wasn’t painting the inside. (You’ll see this in a photo later on.) This wasn’t necessary, but what can I say? I’m a perfectionist!
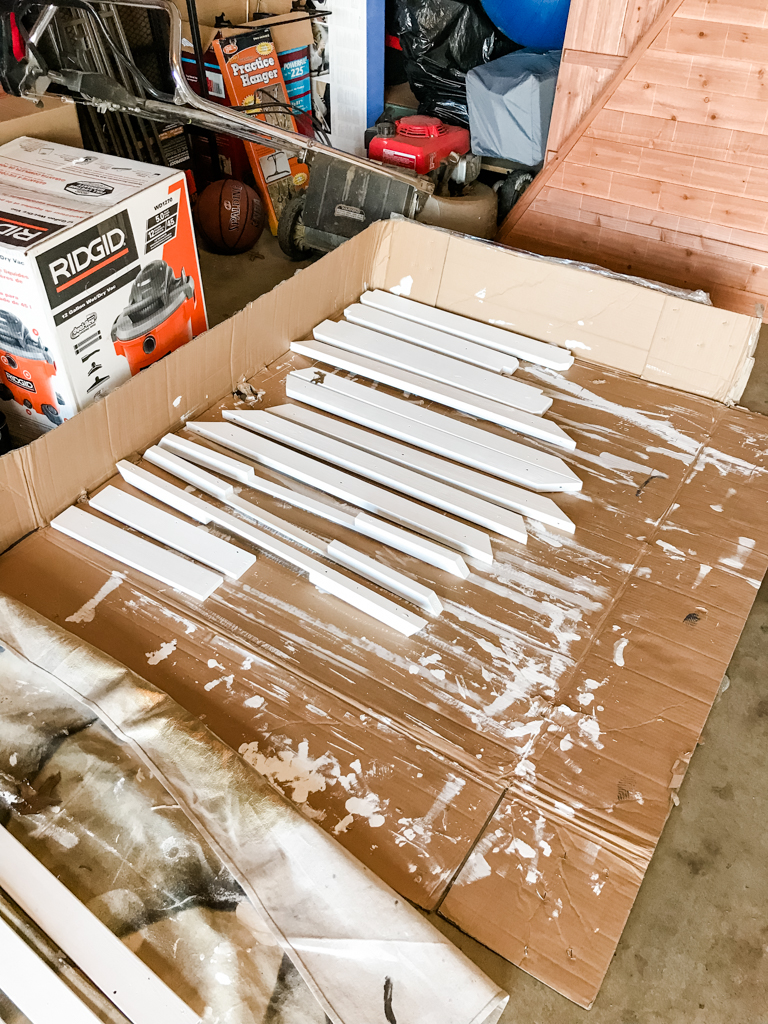
Step 3: Apply a Coat of Primer
Time: 1.5 hours
People Required: 1 (But helpful to have 2)
Supplies: Gallon of Kilz, angled paint brush, mini paint roller, paint tray
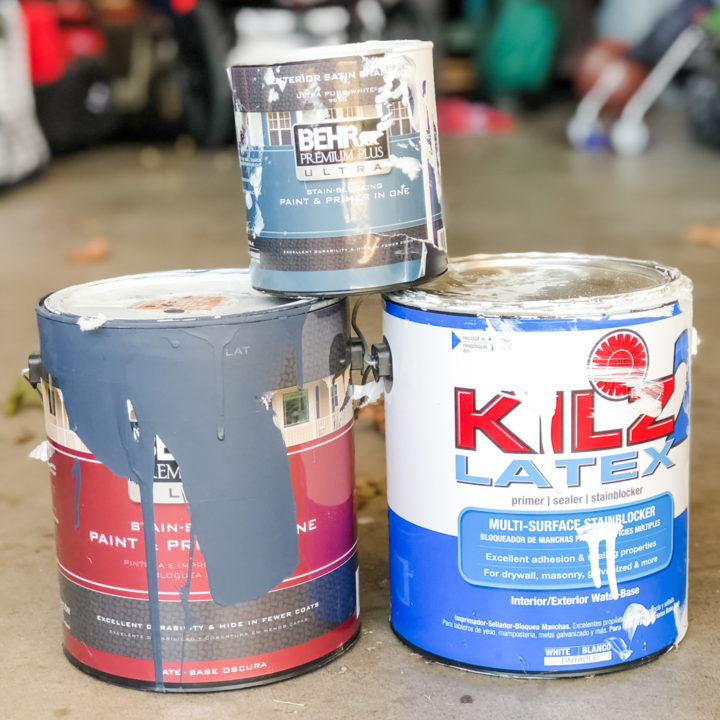
The next step is to prime all the wood pieces you intend to paint. To choose paint for this project I took the advice of the pros at the Home Depot. I showed pictures to an associate at our local store, and he recommended that I start by coating everything with a coat of Kilz before painting with exterior paint.
I used a small roller and hand brush to coat all the pieces. The roller worked well for the big parts, but I preferred the brush for the smaller pieces as it gave better coverage.
Here is a link to the primer I used: Kilz 2 All Purpose White Interior/Exterior Multi-Surface Primer, Sealer, and Stain Blocker (1 Gallon).
One other important thing to note is that when you paint these pieces you will cover the stamps that labels each part. I kept a sharpie on hand and would re-write the part number on the cardboard by each piece and then copy it onto piece when it was dry. This was very helpful when my dad and Andrew assembled the play house.
Step 3: Spray Paint Accessories
Time: 45 minutes
People Required: 1
Supplies: Plastic drop cloth, wood skewers, cardboard boxes, gold  and white spray paint


The accessories that come with the playhouse arrive in primary colors, yellow, blue and red. To give them a more chic appearance I decided to spray paint the accessories such as the sink faucet and handles, mailbox and clock arrows, gold.
I used a plastic drop cloth along with skewers stuck through it into the ground to help elevate the pieces so I could paint all sides of them easily. I used my favorite gold spray paint to give them a quick coat. My one regret of this project is not topping these with a protective lacquer coat to seal them. Almost two years later, these are the only things that are chipping.
Word of warning: all gold spray paints are not made equal. Some end up too metallic and others too brassy. This is my favorite gold spray paint to work with: Rustoleum Metallic Gold Spray Paint.
In addition to the accessories, I also spray painted the window casings which were originally red. I used a flat white spray paint to cover these: Rustoleum Flat Enamel Spray Paint.
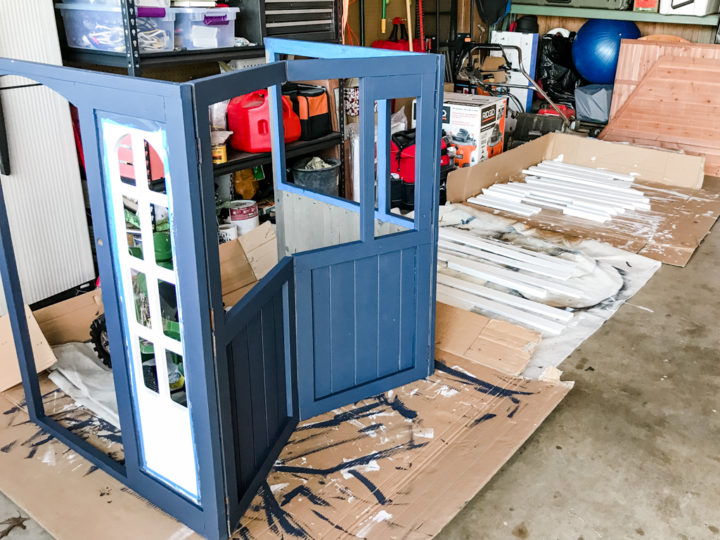
Step 4: Paint
Time: 2-3 hours (depending on the amount of coats you apply)
People Required: 1 (but nice to have 2)
Supplies: Sanding block, exterior paint in white & navy, two angled paint brushes, two mini paint rollers, two paint trays

Before I started to paint over the primer I took a sanding block to a few pieces that had drip marks from the primer and sanded them down. Then it was time to paint!
To paint the trim pieces, eaves, counter tops and door I used a white exterior paint with a satin finish: Behr Premium Plus Paint & Primer in One, Exterior Paint, Satin Finish, Ultra Pure White (1 Quart). One quart was the perfect size and I had about a quarter of the can left over. To get the white really white like I wanted it, it took three coats.

For the main house color I chose a navy blue – the same color that I had previously painted our front door. Naval is technically a Sherwin Williams color but it’s a very popular shade, so associates at Home Depot or Lowe’s should be able to pull the color codes up in their computer and custom mix it for you. I had it mixed into a Behr paint: Behr Premium Plus Paint & Primer in One, Exterior Paint, Flat Finish (1 Gallon). I purchased a gallon, and barely used half. I did used three coats but could have easily gotten away with two and purchasing half the amount of paint.
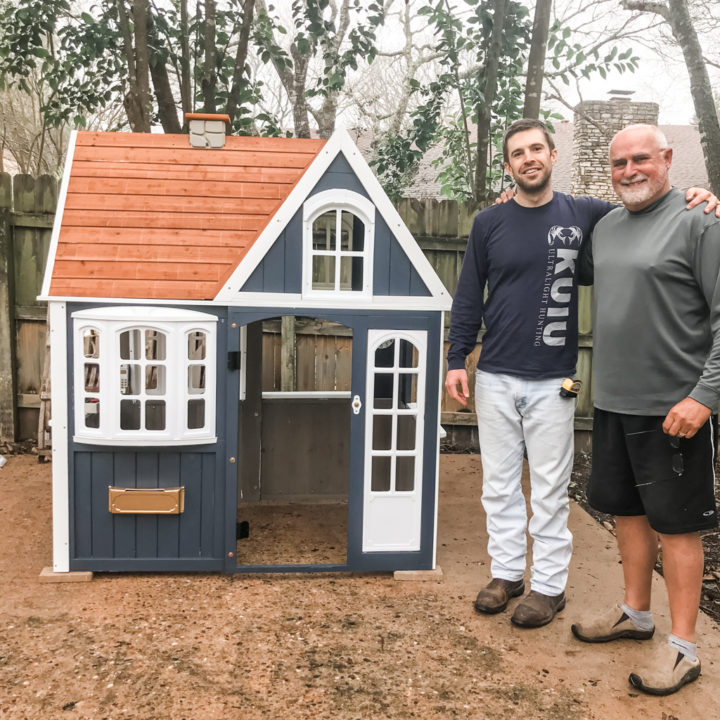
Step 5: Assemble the Playhouse
Time: 4-5 hours
People Required: 2
Supplies: Instruction manual, drill, provided drill bit, level, assembly app
Once all your paint is dry you are ready to assemble. We moved all the pieces to the back yard to the concrete slab where our playhouse would ultimately live. It took Andrew and my dad about 4 hours to assemble the playhouse.
As the instruction manual states, it’s best to do this with two people since it’s almost impossible to do this with one person. I helped by pre-sorting all the pieces into groups per the instruction manual so it took a little less time as they weren’t having to search for pieces every step of the way.
Also, the manual will instruct you to download an app which has step-by-step instructions, videos and more detailed schematics to make assembly easier. The guys didn’t use it religiously but it did help on a few confusing parts.
Step 6: Accessorize!
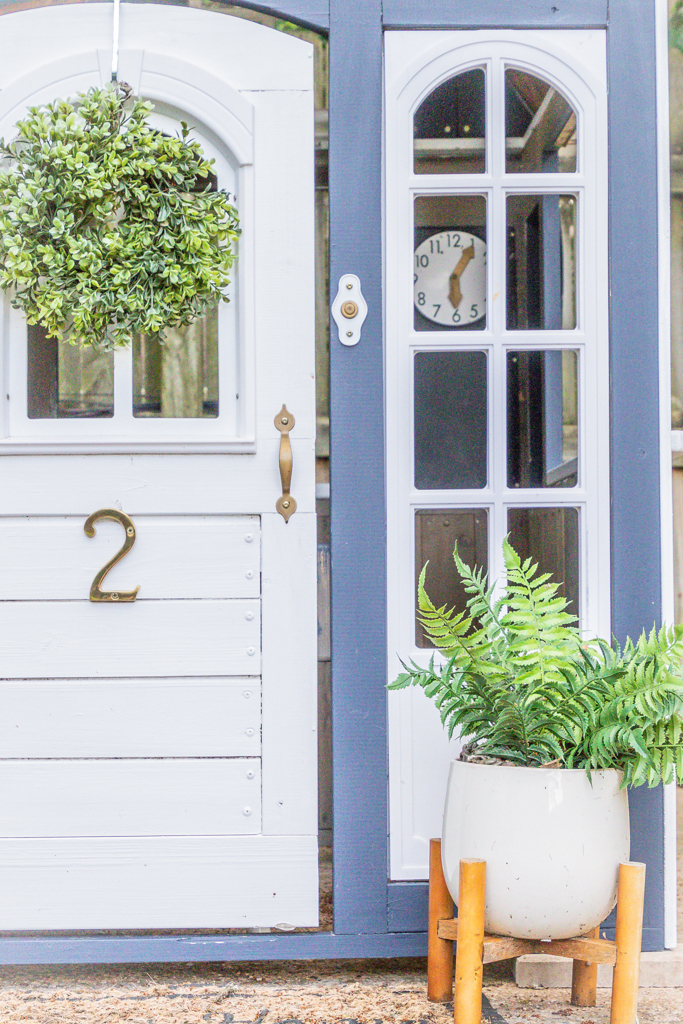
Custom accessories really take this playhouse from house to home. To spice up the front door I added an artificial boxwood wreath from At Home and a brass house number from Amazon. (Here is a similar boxwood wreath on Amazon.)The instructions call for the mailbox to go on the door, but I moved the mailbox to the front exterior wall so I would have room for the house number.
I also found a cute little planter at Home Goods.

Another special touch I added was this brass dinner bell from Amazon. Annabelle love’s clanging the bell when an order’s up! (It isn’t available in gold anymore, but I would buy this same one in black and just spray paint it!)

While a big project, this playhouse makeover was a total success. It has been an amazing toy and has served our family well. If you have any questions, feel free to leave them in the comments below!

Shop This Post

Could you tell me the exact type of paint you used? I clicked the link provided but there are so many different options (matte, semi gloss etc) . Thank you! Can’t wait to get started.
This is amazing. I have a playhouse for my granddaughter Brooke and am looking for inspiration to paint it. I love your colour scheme and how you’ve accessorised it.
I always knew I wanted to get my daughter a playhouse and after finding your tutorial, I was inspired and knew this was the exact style I wanted! Thanks for putting together this awesome tutorial! I purchased this playhouse a couple weeks ago, and we started sorting the pieces and painting it with the primer last night! I absolutely love the colors you used. I wanted to do the same, but my daughter is excited for a dark green playhouse, so I think we will be doing that with white trim and the gold accents that you did! I think I may leave the door the natural color for a pop of color, but we will see! Can’t wait to show you the finished product.