
In preparing for the arrival of our baby girl this summer, I have been crafting up a storm. One thing I pinned to my pinterest board before I was even pregnant was an “It’s a Girl” wreath. I love having cute wreaths on my front door, and I especially loved the idea of being able to announce our new arrival to our neighbors and friends who come to visit.
To find inspiration for a wreath, I poured over dozens of pins on Pinterest. I considered doing a hydrangea wreath and also doing another yarn wreath.

It’s a Girl Yarn Wreath //It’s a Girl Hydrangea Wreath
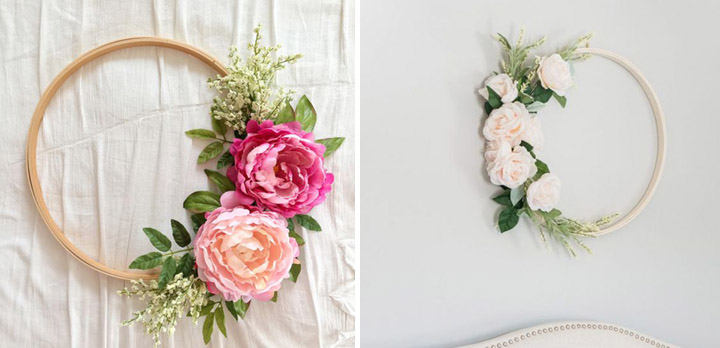
Ultimately, I decided to go modern and try out an embroidery hoop wreath trend. I had an extra hoop left over from my DIY Fabric Scrap and Ribbon Nursery Mobile project, which made the project easy and cheaper!
Here were some of my inspiration photos:
DIY : Embroidery Hoop Wreath by Dreamery Events // DIY Floral Spring Wreath by Wife In Progress
The supplies were simple to find, affordable (which is important when you’re expecting a new baby!) and the whole project didn’t take more than an hour, excluding the time for the spray paint to dry. Here is a quick tutorial on how to make your own:
Step 1: Spray Paint your hoop (or Leave it Natural)
I started by spray painting the embroidery hoop gold. To do this I hung it from some fishing line from the limb of a tree in my front yard. I used Rustoleum Bright Coat in Gold from Walmart. I considered leaving it natural, but I thought the gold was cute and added a nice accent.
Step 2: Arrange & Wire on Your Flowers
Next, I trimmed the florals and arranged my design. I started by layering on the greenery – in this case, eucalyptus. Next, I arranged the flowers. When I was happy with the arrangement, I used floral wire to secure everything. It took a little trial and error, but I love how the arrangement turned out.
Step 3: Cut & Add “It’s a Girl” Cutout
I used my Silhouette Portrait to cut out the “It’s a Girl” script on gold glitter cardstock. Below, I’m sharing the It’s A Girl Silhouette Cut File I designed, plus a PDF version in case you don’t have a machine and want to print and trace it.
Ideally, I would have loved to have the cutout be wooden to hold up better in the elements, but I settled for cardstock to keep the project inexpensive and something I could do myself. Ultimately, I decided to laminate it to make it a bit more sturdy. Lastly, I hung the “It’s a Girl” cutout from the hoop using fishing wire.
Step 4: Display your Wreath!
While I was so excited to hang my wreath on our front door, the nurses at the hospital cautioned against doing anything to call attention to the fact that we have a new baby at home. (Apparently that can make you a target?! How sad.)
I was bummed, but not too bad. Instead of hanging the wreath on our front door I hung it on the door to Annie’s nursery, so I get to see and admire my work more often!
Supply List
These are the supplies I ended up using for this project. I would recommend buying more flowers than you need and returning what you don’t use.
- (2) Faux Rose By Ashland® – White – 23 in
- (1) Ashland® Wild Daisy Spray, Cream White – White/Cream – 29 in
- (2) Eucalyptus Stem by Ashland®
- (1) Light Pink Hydrangea Stem By Ashland®
- (1) Light Pink English Rose Stem By Ashland®
- 12″ x 12″ Glitter Paper By Recollections® – Divine – 12″ x 12″
- It’s A Girl Silhouette Cut File or It’s a Girl PDF File
- Embroidery Hoop
- Green Floral Wire
- Gold Spray Paint
- Fishing Line
Photo by: Kelly Leeves, Captivating Life


What size is the embroidery hoop in your “It’s a Girl” wall hanging? I am having a coworker of my daughter cut out the glitter card stock design, but I need to get started on the rest of it before I receive that from her. So, it would help me if I knew how many inches in diameter or some other measurement that would help me pick out the correct size embroidery hoop that would match the glitter paper cut out in proportion. Thank you so much!
The one I used has a 14″ diameter! Hope this helps!