
I have always wanted to learn how to do machine embroidery, so for Christmas a few years ago my husband bought me a Brother Sewing and Embroidery Machine. (In the past they’ve gone on sale on Black Friday/Cyber Monday for under $300, so I sent him a link when I saw the deal go live!)
Over the course of the last few years I have learned so much about my machine, sewing and embroidery in general. To even get to this point has required a lot of patience and reading/researching on countless blogs.
One of the most frustrating things when I was first starting out was figuring out the supplies I needed to get started. What type of stabilizers do I need? What size needles should I use? Do I have to use embroidery thread or can I just use regular?
I longed for a resource that would list out exactly what I needed to buy so that I’d have all the supplies on hand to applique, embroider or sew on any fabric that I wanted. Since I never found that, I’ve decided to share my wisdom so other beginners starting out with their Brother embroidery machines can have it all in one place.
In this post I will share insights on three main topics:
- Choosing an embroidery machine
- The supplies you need to get started with machine embroidery
- The basics of choosing embroidery software
Why I chose the Brother SE400 Machine (Review/Rating)

At a friend’s wedding I got to talking with a friend about how she’d recently taken up machine embroidery. It was something I had always been intrigued by, but thought the cost of the machine was too prohibitive. Then she told me about how she bought her machine, a Brother SE400 (now sold as SE600), on Amazon on Cyber Monday for less than $300! I was so excited. I just had to have one for myself!
From that August to December I did research on embroidery machines and stalked the internet ready to pounce on a good deal. What I learned is that the Brother SE400, which is almost identical to their newly released upgrade the Brother SE600, is a great entry level embroidery machine for beginners. With it you are limited to a 4×4 hoop size, but with some skillful maneuvering you can get it to sew larger designs. (I still haven’t tried/figured this out yet.)
It serves as either an embroidery machine or a basic sewing machine. I love this featured since it saves space in my home having one machine instead of two. Lastly, there are TONS of YouTube tutorials dedicated to this machine, so it would make learning that much easier.
What is the difference between the Brother SE400 and Brother SE600?
Since I purchased my machine, Brother has released an upgraded version, the Brother SE600. Essentially they are the same machine with a few key differences that actually matter:
- Display – The SE400’s display screen is smaller and black and white. The SE600’s screen is a little larger and offers color.
- USB Connectivity – With the Brother SE400 you connect the machine directly to your computer. With the SE600 you save your designs to a USB stick then plug that into the machine. (At first I thought I would love having the direct connectivity, but now prefer the USB stick option.)
Other things that differentiate the two that don’t really matter in my mind are that the SE600 offers one more embroidery font – I use fonts from my computer – and 36 more sewing stitches (103 vs 67). I’ve only used 3 sewing stitches ever so I don’t think i’ll miss those! Also the SE400 has an embroidery card slot and the SE600 does not. I’ve never used this so it’s not a big deal for me.
If I were to purchase new, I’d definitely buy the Brother SE600 or the Brother PE800, which I describe below.
Which features do the Brother PE770 or PE800 offer versus the SE400 and SE600?

The main reason to choose the Brother PE770 or Brother PE800 models over the Brother SE400 or Brother SE600 is based on the hoop size. These two machines offer a 5×7 hoop while the cheaper models offer only a 4×4 hoop.
Note that while you do get a larger hoop size, you lose the sewing capability. If two-in-one functionality is important to you, stick with the Brother SE600.
My mom recently purchased the Brother PE800 and I’ve had the chance to work on it a few times. She already had a nice sewing machine and wanted the larger hoop area. I like it just as much as my SE400, and found the color screen to be a nice feature. It is also a bit faster than my model, offering 650 stitches/minute vs 410 stitches per minute.
What supplies do you need to get started?
I let my husband know that was what I wanted for Christmas, and when it went on sale on Cyber Monday I not so subtly sent him the link. On Christmas morning I was so excited to open my new toy and was overjoyed to learn that my mom had purchased me a set of embroidery thread and some stabilizer so I could get started right away.
Though I know the basics of sewing, which my Grandma taught me one weekend years ago, it had been ages since I had actually practiced. Luckily, my mom is a great seamstress and helped me get my machine set up. With some trial and error, we got things working pretty quickly.
Below is a list of all the supplies I have purchased over this year to do the various projects I’ve taken on. Honestly, I didn’t realize till I started typing this out just how much you need. I figured this out over the course of months and would have to wait 2 days (gotta love Amazon Prime) between starting a project and ordering the supplies to get what I needed, so most of this stuff I’d just go ahead and buy.
You may have some of the things (like scissors), so don’t worry too much about those. I put links to things on Amazon but a lot of this stuff they have at Hobby Lobby, Walmart and Joann’s. (I bought most of my stuff on Amazon or at Walmart.) They don’t have this stuff at Michael’s, so don’t try there. On to the list!

Supplies Needed to Get Started with Machine Embroidery
Stabilizer
The machine comes with most everything you need to embroider, except stabilizer. You cannot embroider with out stabilizer. You’ll end up needing several different kinds depending on the types of fabric you’ll be embroidering on, so I’d recommend just going ahead and tossing all these in your Amazon cart and investing in them up front. There is nothing more frustrating than going to start a project and not having all the supplies you need!
I was pretty overwhelmed with how to choose stabilizers at first. And once you know what kind you need – tear away, cutaway, etc. – the sheer amount of choices available can be overwhelming. I finally found Machine Embroidery Guide from The Seasoned Homemaker. Read her series to understand just why you need stabilizer and what kinds there are. Based on her recommendations, these are the products I ended up buying:
Stabilizer for 4×4 Hoops
- Cut Away Stabilizer – World Weidner Cut Away Machine Embroidery Stabilizer Backing 100 Precut Sheets 8?x8? Medium Weight 2.5 Ounce Fits 4×4 Hoops – Cut Away stabilizer is what you’ll use for knit (stretchy) fabrics. This is what you’ll use most. If you’re limited to a 4×4 hoop, as you are with the Brother SE 400, it’s nice to have these pre-cut into 8×8 squares.
- Tear Away Stabilizer – Tear Away Machine Embroidery Stabilizer Backing 100 Precut Sheets 8?x8? Medium Weight 1.8 Ounce Fits 4×4 Hoops – Tear away stabilizer is good for woven fabrics. I use this for doing towels. I thought at first I’d use this for everything but I’ve since learned that you can’t use this for knit fabrics such as t-shirts.
Stabilizer for 5×7 Hoops
- Cut Away Stabilizer – World Weidner Tear Away Machine Embroidery Stabilizer Backing 100 Precut Sheets Medium Weight 1.8 Ounce 12?x10? Fits 5×7 Hoops – Like I said above, cut Away stabilizer is what you’ll use for knit (stretchy) fabrics. You’ll use this most often. These are conveniently cut into 8×12 pieces to fit in 5×7 hoops.
- Tear Away Stabilizer – New brothread Tear Away Machine Embroidery Stabilizer Backing 10?x12? – 100 Precut Sheets – Medium Weight 1.8 oz – Fits 5×7 Hoops – Tear away stabilizer is good for woven fabrics. I use this for doing towels. I thought at first I’d use this for everything but I’ve since learned that you can’t use this for knit fabrics such as t-shirts.
Stabilizer for 4×4 or 5×7 Hoops
- Water Soluable Stabilizer – Wash-Away Water Soluble Stabilizer 9 inch x 10 Yard Roll. SuperStable Embroidery Stabilizer & Topping – I originally bought this just to use for towels, but I’ve begun to use a layer on top for embroidering almost everything. It helps give a nicer appearance.
- Self-Adhesive Tear Away Stabilizer – Sulky Sticky Self-Adhesive Tear-Away Stabilizer Roll, 8.25″x6yd – I didn’t purchase this right away, but ended up finding it useful when I started embroidering on napkins. I learned this trick from the Sulky blog for embroidering on linen napkins.
- Tender Touch – Sulky Of America Cut Away Tender Touch Iron-On Backing White, 8″ by 9 yd, June Berry – I use this to iron over the top of the back of projects that need a soft backing and use cutaway stabilizer such as baby onesies.
- Temporary Adhesive (Basting) Spray – Sulky 4.23-Ounce Temporary Spray Adhesive – I use this to temporarily adhere the stabilizer to the fabric to make hooping easier. Here is another option that’s a bit more economical. I haven’t tried it but it gets good reviews: SpraynBond Basting Adhesive.
Embroidery Thread

If you plan to use the embroidery feature regularly, I recommend investing in a set of embroidery thread and extra needles. My mom bought me the set below that has all the colors I’ll really ever need. It’s nice to have several colors on hand to match whatever you’re trying to stitch on.
- 40 Spools Polyester Embroidery Machine Thread – This set offers a great range of colors, and I have been very pleased with both the quality of the the thread and the color selection.
- 63 Brother Colors Embroidery Machine Thread – If you want more options, the same company also offers a thread set that has 63 colors. (The 40 spool set has been good enough for me so far.)
- 20 Cone Set Polyester Embroidery Thread – Neon Bright Colors – The only exception was when I did a beach towel project and needed some neon colored thread. This set works great if you need some brighter colors.
- OPTIONAL – Thread Spools Savers – These nifty little guys are awesome. They help keep thread ends together, making thread storage so much easier and neater!
What size needles do you need to embroider with the Brother SE400, SE600, PE770 OR PE800 Machines?

For most embroidery projects on the Brother machines, you will need a 75/11 embroidery needle.
I did a lot of fretting about what type/size of needle I needed. Since I am a sewing novice, I wanted a straightforward answer. Here is the official guide from Brother for the SE400 machine. I learned that when embroidering it’s important to have an actual embroidery needle. (Learn more about needles from the Seasoned Homemaker.)
Originally, I bought mine at Walmart, but you can buy them online below at Amazon, or Hobby Lobby or JoAnn’s. I also recently learned that Organ and Schmetz needles work best for the Brother machines. I had a package of Inspira ones that kept breaking. Once I switched to Schmetz the problems went away, so I think there is really something to this advice. I’ve since learned most experience embroiders have a reference towards Organ. I recently bought this pack of Organ 75/11 needles on Amazon and love them.
When you’re first learning you’ll inevitably break a lot of needles. (Or I did!) So go ahead and buy an extra pack or two.
- Extra Embroidery Needles – Schmetz Machine Embroidery Needles 75/11 or Organ 75/11 Embroidery Needles
- OPTIONAL – Alcohol Swabs – Covidien 5750 Curity Alcohol Prep, Sterile, Medium, 2-ply (Pack of 200) – I read that basting spray and adhesive stabilizers can gum up your needles, so to have these on hand to wipe down your needles between projects to make them last longer. I don’t know how much truth there is to this but I figure it couldn’t hurt.
Extra Embroidery Hoops
- OPTIONAL – Extra Hoops – 3-Piece Embroidery Hoop Set for Brother SE 600 Embroidery Machines – You might hold off on ordering this at first, but once you get a hang of things it’s nice to have an extra set of hoops. The Brother SE400 and SE600 machines come with one 4×4 hoop. The PE770 and PE800 machines come with one 5×7 hoop. I use my 4×4 hoop the most. It’s nice if I’m doing multiple things to be able to hoop the next item while my machine is sewing out the first one. My mom, who has the PE800 machine, bought this set so she’d have access to a 4×4 hoop. Sometimes, especially if working with baby items, a 5×7 hoop can be too big. I bought this multi-pack because I wanted the smallest hoop. I’ve found the small hoop is useful for embroidering on smaller items like baby clothing and hats.

To Appliqué
The supplies above for embroidery should cover everything you need to appliqué with the exception of:
- HeadnBond Lite – Heatnbond Thermoweb Heat’n Bond Lite Iron-on Adhesive – Check out YouTube to learn to applique and learn why you need this!
- Scrap or Quilt Square Fabric Bundle – For applique designs you’ll stitch a cute fabric onto your item. When getting started it can be helpful to have a pile of leftover fabric scraps, fat quarters or a quilting square bundle. This Quilting Square Bundle on Amazon is a great deal for the quantity and variety of fabrics it offers. If you prefer to buy in person, Walmart and other sewing supply stores like Hobby Lobby offer fabric bundles called fat quarters in lots of colors/patterns. I use these to practice on/use with burp cloths.
- OPTIONAL – Applique Scissors – Gingher 6 Inch Knife Edge Applique Scissors – For applique it’s helpful to have a detail scissor to more precisely cut around the edges. These are a total game changer! If you’re going to try applique these are a must-have item. They make achieving fine cuts so much easier!
General Sewing Supplies
If you didn’t previously own a sewing machine you may not have some basic sewing supplies. All of these are optional, but would be helpful to have on hand.
- Good Fabric Scissors – Fiskars No.8 Premier Easy Action Bent Scissors – If you don’t have a good pair of fabric scissors, I’d recommend getting some. I suggest keeping them with your sewing supplies so they don’t get gummed up by other craft projects. I love Fiskars because they sharpen well and come with a lifetime warranty.
- A Good Iron – A good iron is critical to embroidery and sewing projects. They don’t have to be expensive to be good. The Rowenta DW5080 Focus Steam Iron is my favorite, but if you’re looking for something a little cheaper, my mom has the T-fal Steam Ceramic Flat Iron and loves it.
- Ball Pins – PandaHall Elite 1 Box About 260-270Pcs Round Ball Map Tacks Push Pins with Needle Points Multicolor – These come in handy when sewing and embroidering.
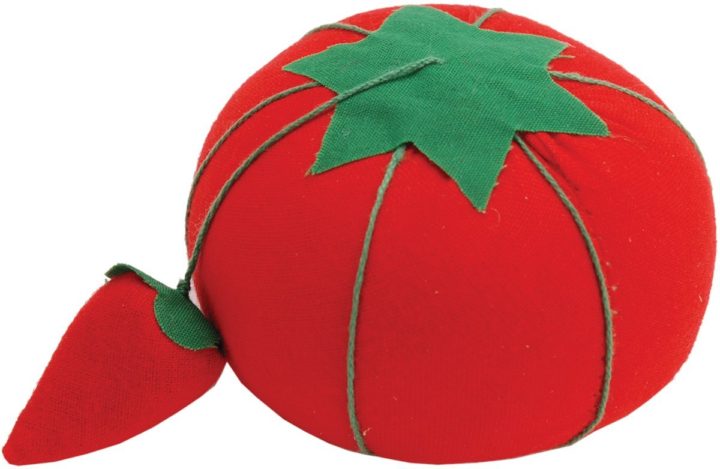
- Pin Cushion – Dritz Tomato Pin Cushion – A pin cushion is helpful to have sitting beside your machine or ironing board to hold your pins. This tomato one is a classic, but there are also lots of other fun pin cushion choices like this one on Amazon.
- Clover Wonder Clips – I was late to the game in discovering these, but they are really amazing and so helpful to have on hand! (I used to use binder clips but they were hard to maneuver and would sometimes pop off.) They open wide to hold large layers of fabric and are very helpful to have when hooping items where you have to hold fabric out of the way such as onesies and diaper covers.
- Tape Measure – Having a tape measure is handy for centering your designs more precisely.
- Seam Ripper – A small seam ripper comes with most machines, but when you are doing a lot of seam ripping it’s nice to have a larger, more ergonomic one.
- Ball Point Needles – Ball Point Sewing Machine Needles Home-use By Organ Needles (10 Needles/pack), Select Size (Size 75 / 11 Ball Point) – You’ll want these for sewing on knit fabrics.
- Dritz Mark B Gone Marking Pen – It can be useful to use a pen like this to mark the center of your fabric.
- Storage cart – I bought one of these carts to fit all my supplies because, let’s face it, this is a lot of stuff! The threads fit it in perfectly and I use the drawers for the various stabilizers, hoops, machine accessories and fabrics.
Fabric or Blanks
You’ll also need fabric to sew with or something to embroider/applique on to. My favorite items to embroider on when I was starting out were Gerber Cloth Diapers which I gifted as burp cloths.
For a full list of my favorite blanks, see my post Best Blanks for Embroidery on Amazon.
How I chose Embrilliance Embroidery Software

Lastly, while not required, you’re probably going to want some software to go with your machine. While technically you don’t have to have software to get started, you’re going to end up buying it soon if you want to purchase designs or fonts and load them onto your machine.
I did lots of research, several trials, and ultimately ended up buying Embrilliance Essentials. (You can buy it direct from Embrilliance, like I did, here, or via Amazon here.)
It is one of the more affordable software options on the market, and it works well with the Brother SE400. Plus, it works well on PC or Mac. Embrilliance Essentials is really all you need to get started. If you want to upgrade to get more features in the future you can add on more modules.
If you’re going to invest in software it also makes sense to have a USB Flash Drive. This will allow you to transfer designs from your computer to your machine.
Whew. That was a lot! In reality, it probably make sense to start with just a few of these supplies and build up as you take on new projects.
To help you get started I created a FREE Machine Embroidery Supply Checklist. It breaks out all these items into must-haves, nice-to-haves, appliqué and sewing supplies. Click the button below to get it.
Or, if you want more embroidery resources and videos, register to get access to my entire Free Machine Embroidery Resource Library.
Good luck and if you have any questions feel free to post them in the comments below!
Hi! I’m in the market for a sewing/embroidery machine and found your advice very helpful. I’m wondering if you can tell me if the SE 400 and 600 model (really all the models) accept larger/smaller hoops. I see them sold but just don’t know if they’re compatible. Also I don’t get where the thread is loaded on the machine. I don’t live close to a store where I can try things out…so I’m trying to figure things out via the internet which is tricky! Thank you for taking the time to share your advice!
So yes, they will accept smaller/larger hoops. But on the SE400 and SE600 you will still be limited to a 4×4 design size. Same with PE770 and PE800 – you can use a 4×4 hoop or a 5×7 but you are still limited to a 5×7 design size.
Thank you for sharing bought my first set of needles today.
This is so helpful! Thanks for putting all of this in one place! I think I added 10 things to my Amazon wish list haha. Excited to get started on my brother SE600 with the advice laid out here! One question, when I was reading through the manual it stated to get 60 wt embroidery thread but most things I see are 40 wt. Thoughts on that? Does it matter?
Good eye! I was worried about that at first but after reading lots of reviews I bought the products I’ve listed above. Having 40 wt thread hasn’t seemed to matter, I am still able to sew out beautiful designs!
I practically never respond on blogs anymore, but I really, really want to thank you for all of this amazing information! I just got a Brother SE600, and really have no sewing/embroidery experience, so this is so helpful!
Hi! I just started machine embroidery with a Brother SE600. Your post was so helpful in getting me started! While I bought both the regular machine embroidery needles you suggested and the ballpoint, I only just realized that I think I’ve been using the regular needles when I should have been using the ballpoint! Is the difference simply that you should use ballpoint on any kind of knit, like a baby onesie or t-shirt/cotton fabric? And otherwise use the regular 75/11 embroidery needle (for towels, burp cloths etc)? Everything I’ve embroidered so far has mostly been knit baby onesies. I’ve used the regular needles (not ballpoint) and it has worked, but maybe it would look better with the ballpoint needles? Thanks in advance for any advice!
Hey Caroline, I would say if you’re getting results with your 75/11 needle just go with it! I had a friend who told me about the ballpoint needles and I do find it looks slightly better when I use them on knits like tees and onesies. But honestly it’s not that much of a difference that I take the time to switch…I’ve gotten a little lazy!
How do you recommend choosing stabilizers when working with burlap, especially considering the amount of loose fibers?
Hi Brenda – honestly I’ve never embroidered on burlap before. What a good idea though! I found an article and based on it, I would probably choose a cutaway stabilizer with spray adhesive and put water soluble stabilizer on top. As the article notes, make sure to think about your design and go for a solid, stitch filled design or satin stitch.
Hi
Thanks for all the advice.
I’m looking into buying the Brother PR 800.
So if I want to just make my own designs should I buy the Embrilliance Essentials?
I’m confused ?
i am trying to buy a compact sewing cabinet for my daughter-in-law who still has her brother se600 in a box since last Christmas. do you have a suggestion on a cabinet that fits this machine. space is limited so to hide the machine when not in use would be a must. she is a newbie to the sewing world as well. any suggestions would be greatly appreciated. thanks 🙂
There are not even enough kind words to explain how thankful I am to you for your post. I bought this machine for my 19 year old daughter and because of your post, Santa was able to make sure all the right supplies were under the tree for her so she could get started right away. I would have been lost without your advice. I have a quick question. She would like to buy the software. Do you know if the Embrilliance Essential program allows you to create your own designs?
Thank you again for this post… It was a life saver. Wishing you a happy and healthy new year.
Just curious what type of stabilizer would you use on a ball hat?
As a newby I’m very appreciative of your ‘get started’ list, I found you affiliate links to Amazon were a lot less expensive than the same items at Walmart.com. Thank you!