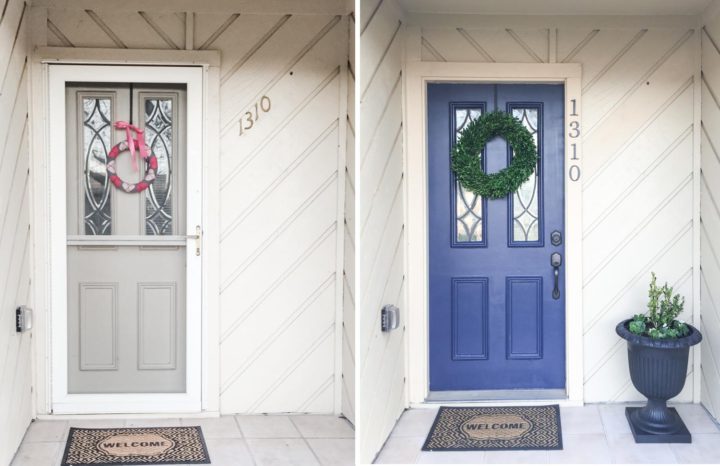
When we first moved into our house the first big project I took on was giving the front door an update. We moved into our house in November, so with cooler temps and ornery weather I had to wait until early March to start the project. By that time I was more than ready, with a plan in hand.
A first time home owner, I had never taken on a project like this before and learned lots of things along the way. I did this project over the course of a long weekend, starting on a Thursday and finishing it up on a Sunday.
In this post I will walk you through the transformation step-by-step and then share info on how I styled it to really make it feel complete.
Before
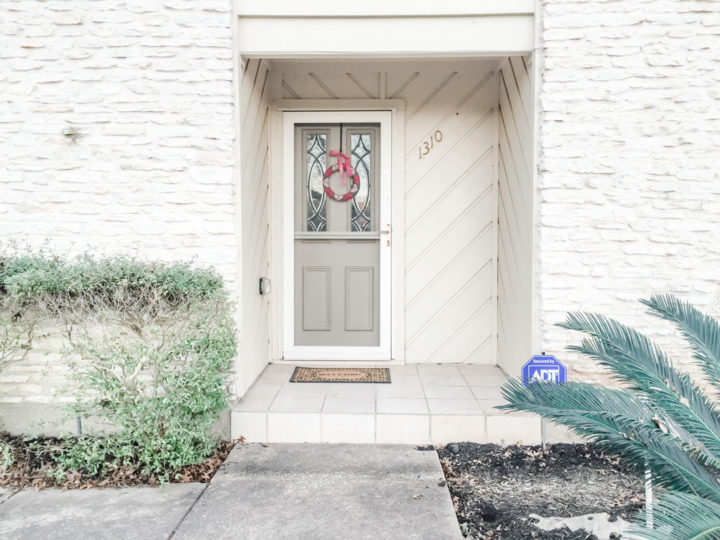
When we purchased the house the front door was covered by a storm door. From the start I knew it had to go. It dated the house and was a pain to deal with when bringing in groceries.
The front door was painted a boring beige, the same color as the entire exterior. I wanted to add a pop of color, but still keep a traditional feel.
Also, the door hardware mismatched and dated looking. I wanted to find a new door handle and lock set to complete the makeover. Lastly, I wanted to replace the dingy house numbers with something more modern to match the door hardware.

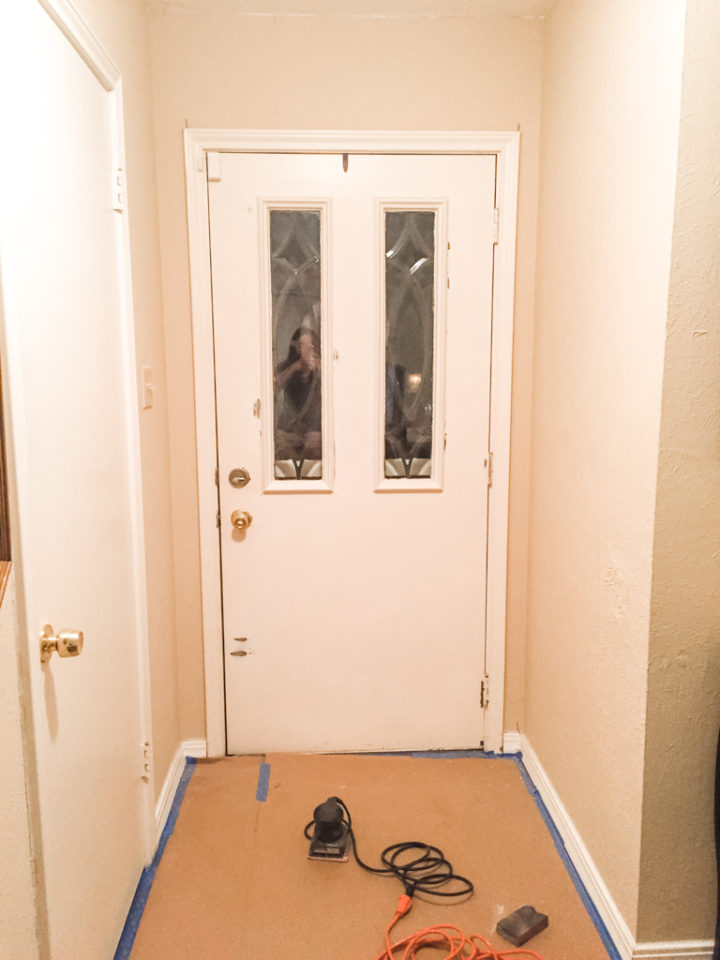
Removing the Storm Door

The first step in the process was removing the storm door. This part was surprisingly simple. I did it myself with no help from Andrew! I simply went to work with a screwdriver and unscrewed the door from the frame. With a little prying with a screw driver it popped right off!
After I was done removing the door, I used wood filler and a putty knife to go back and spackle the holes that were left from the storm door.
I also removed the house numbers. They left a mark and some holes, so I filled those holes and then repainted the siding where they were hung.
When I was done, I gave the whole door a good sanding, top to bottom.
Front Door Paint Prep
As with most paint projects, the prep takes longer than the actual painting.
I used brown kraft paper and painters tape to cover the wood floors in our entry way. I also taped off the glass on the front side of the door and laid canvas drop cloths on the front porch to protect the surfaces from paint.
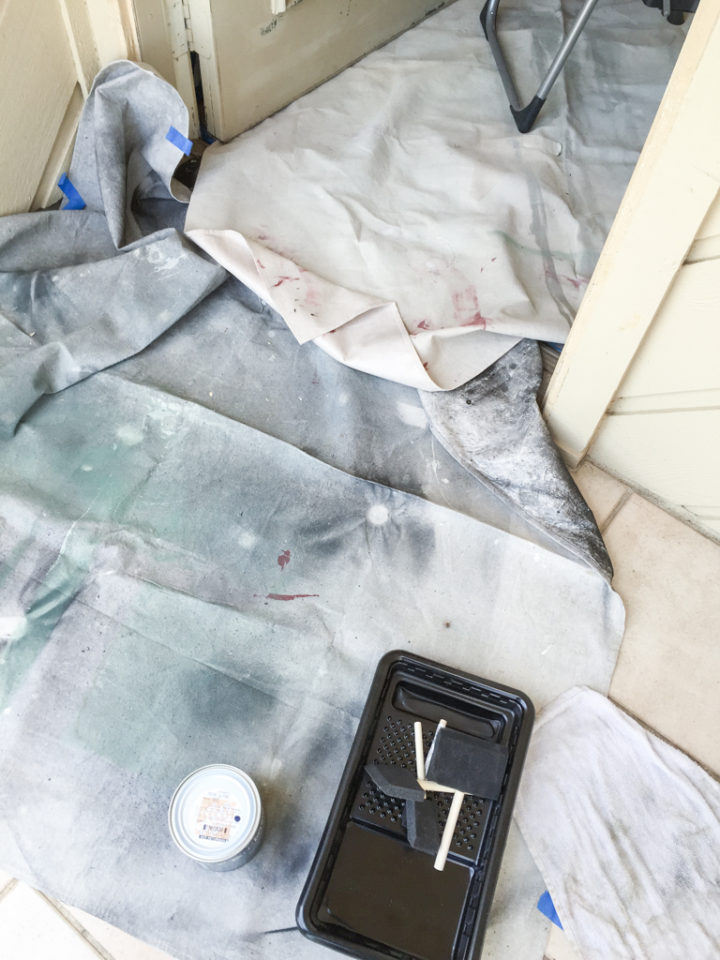

Lastly, I removed the door hardware, which was easy with the help of a YouTube video.
Choosing Paint & Painting the Door
After debating paint colors a LOT, I opted for a Benjamin Moore color, Hale Navy. I had it mixed at Home Depot into Behr Premium Plus Paint & Primer in One.
(This is the same color I used to paint our playhouse, which you can see in my Blue & White KidKraft Playhouse Makeover Tutorial.)
I started painting early in the morning so it would have a full day to dry. I wanted to have it done in a day so that I could put the hardware on that night and have the house safe and secure by bedtime.
Since the door was already a light color, the Home Depot pros told me to skip a primer. It took a good three coats to get the door fully covered and looking good. To paint I used a mini roller to make the larger areas of the door smooth and an angled brush to get in the crevices of the molding. I was done painting by about 10 am.
Installing the Hardware
That evening, after the paint dried, around 10 pm, my husband, Andrew, his dad and his grandpa all worked to get the new hardware on the door. I chose a pretty oil-rubbed bronze set that I found at Home Depot: Belleview Venetian Bronze Single Cylinder Door Handleset.
It was quite the project and tricky to fit the new parts in the old holes. There were some spots they had to sand down the wood or widen holes with a drill.
If I were doing the project again, I’d get the hardware fitting before I started painting to make sure everything fit so we wouldn’t scuff up the new paint job.

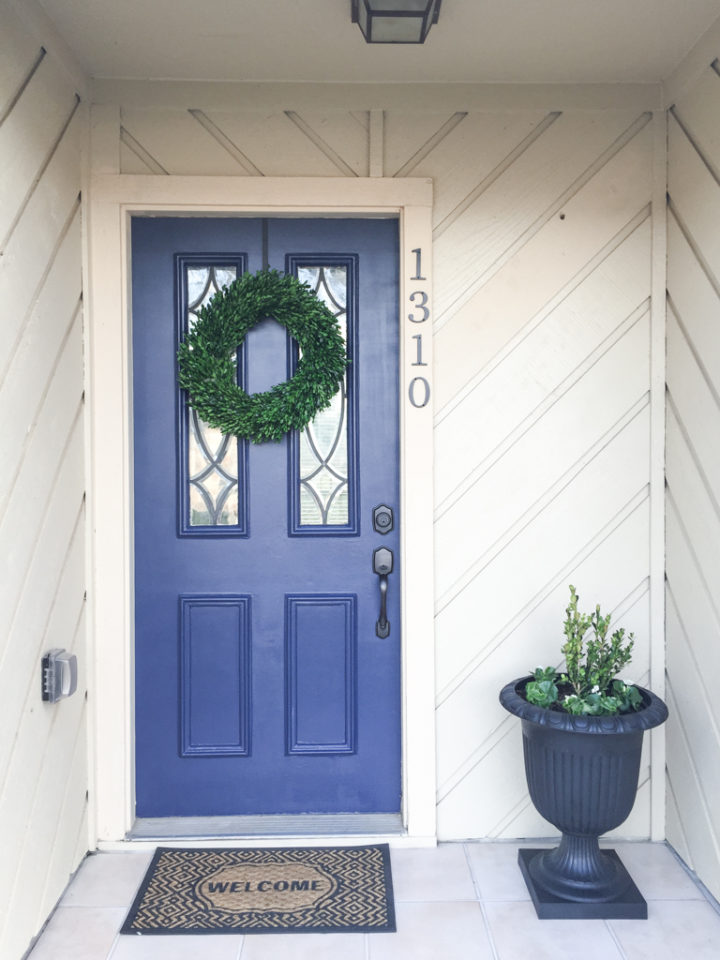
After: Styling the Porch
After the paint was dry and new handleset was on, I needed to add accessories.
First, I needed to replace our house numbers. I found a love the classic serif look of the house numbers I found at Home Depot: 5″ Oil-Rubbed Bronze House Numbers. This time, I placed them along the frame of the door instead of diagonally like they were before. I think this simple change made a big difference.
I found a dried boxwood wreath at Target that was perfect for spring. The wreath actually ended up molding just a few months after hanging it up which bummed me out. If you are looking for a boxwood wreath, I’d recommend getting a high quality artificial one (not preserved) like one of these two from Michaels or Amazon.
Lastly, I found a large urn planter at Target and planted a boxwood and some begonias in it.
For less than $125, the bulk of which was spent on the new door handle, I gave our front porch a serious face lift. Someday I would love to have a new front door, but for now I am very happy with how it turned out!
Shop this Post

Paint Supplies
- Paint – Behr Premium Plus Paint & Primer in One – 1 Quart, Hale Navy
- Paint Brush – Good 1.5 in. Angled Sash Polyester Paint Brush
- Paint Roller – Better 4 in. x 3/8 in. High Density Knit Fabric Mini Roller Assembly with Frame
- Paint Tray – Plastic Mini Roller Tray
- Painters Tape – ScotchBlue Painter’s Tape with EdgeLock
- Drop Cloth – 6 Ft x 9 Ft Medium Duty Canvas Drop Cloth
- Kraft Paper – Easy Mask 2.9 ft. x 140 ft. Builder’s Paper
- Wood Filler – Plastic Wood 3 oz. Natural Latex Wood Filler
- Putty Knife – 2 in. Stiff Putty Knife
Accessories
- House Numbers – 5 in. Oil-Rubbed Bronze House Number
- Lock Set – Belleview Venetian Bronze Single Cylinder Door Handleset with Cove Door Knob Featuring SmartKey
- Boxwood Wreath (Exact, Not recommended) – 21.2″ Dried Boxwood Leaves Wreath – Smith & Hawken™
- Boxwood Wreath (Better) – The Wreath Depot Arbor Artificial Boxwood Wreath 22 Inch or 22″ Boxwood Wreath by Ashland®
Leave a Reply